Sweet & Tangy Marinated Tofu Bowl w. Pickled Strawberries

In my world, there is one rule for cooking: cook smarter not harder

so when you make this recipe, it’s basically like making lunch WHILE doing meal prep. Convenient, eh? (If you have low spoons, there are tweaks for you too!).

The reality is, so many people I talk to are simply sick of cooking, and it’s a daily chore they handle with varying levels of exasperation. Some are driven by the simple need to get fuel into their body, while others trudge through mealtime, bored & wishing they had more motivation, energy and creativity to cook tastier meals.

My cooking ethos is simple; making meals that pack restaurant quality flavor at home, should be easier. It should be more accessible. And it should be less exhausting. This recipe embodies those principles.

A combination of a few simple ingredients, given a tiny bit of extra TLC, can (and will) blow you away. And if I am ever going to present you with a recipe that involves many ingredients and numerous steps, I promise it’s because it’s going to pay off.

Making a large batch of each of this dishes numerous components means you’ll have delicious food to reach for all week long. From a crunchy quinoa topping you will want to put on everything, to tangy pickled strawberries that will blow your mind, to simple savory lentils that will help keep you fed. And when you sit down to enjoy how this orchestra of flavors and textures comes together in one bowl, you’re going to be SO glad you trusted me on this.


Sweet and Tangy Marinated Tofu Lentil Bowl with Pickled Strawberries

4-6 servings (store each component individually for ideal use throughout the week)

  • 1 cup lentils of choice, or 1 cup pre-cooked lentils

  • 1 cup rinsed quinoa, or 1 cup pre-cooked quinoa

  • 14 oz block of extra firm or firm tofu

  • 1/3 cup coconut aminos or tamari (soy sauce works too)

  • 1.5 Tbsp rice vinegar

  • 3/4 Tbsp honey, brown sugar or maple syrup

  • 1/2-1 medium garlic clove, finely grated

  • 1/4 - 1/2 teaspoon fresh ginger, finely grated

  • 1 tsp Mr. Bing sriracha, or to taste

  • 1/2 lb (8 oz) of firm, clean strawberries 

  • 1 cup white balsamic or other mild vinegar like rice vinegar

  • 1 tsp sugar

  • 1/2 teaspoon kosher salt

  • 1 small bunch scallions

  • 1 mild or hot red pepper, Thai chili 

  • 1 small ripe avocado 

  • Extra virgin oil

Prep Lentils

If not using pre-cooked lentils, which is a great time-saving hack, start by cooking 1 cup of lentils in a pot according to package directions. You can prepare more if you want an extra big batch for a large household or to freeze some.

Prep Quinoa

While lentils cook, prepare quinoa (again, if you have low spoons use a pre-cooked option). Cook at least 1 cup so you have leftovers. Once the quinoa is cooked, drizzle with olive oil.

Pre-heat an air fryer or your oven to 400F. Lay quinoa out in a single even layer (on air fryer insert/basket with a piece of parchment, or on a sheet pan) and toast for 15 minutes, stirring every 5 or so minutes, until crispy and dark golden brown. Toss with sea salt when hot and store in a Tupperware.

Prep Marinated Tofu

Drain liquid from tofu packaging & then to remove additional excess liquid, microwave tofu in a bowl for 2 minutes.

Pour out any released liquid, then press tofu under a heavy object between 2 sheets of paper towels another 15-30 minutes. Then cut tofu into small squares and in a bowl, marinate with below ingredients: 

  • 1/3 cup coconut aminos or tamari (soy sauce works too)

  • 1.5 Tbsp rice vinegar

  • 3/4 Tbsp honey, brown sugar or maple syrup

  • 1/2-1 medium garlic clove, finely grated

  • 1/4 - 1/2 teaspoon fresh ginger, finely grated

  • 1 tsp Mr. Bing Sriracha, or to taste

Marinate for at least 10-15 minutes. Then top with 1/2 cup scallions cut on the bias, and 1/4 cup red chili cut on the bias, adjusting the amount of chili for how hot your pepper is. Store in the fridge up to 5 days.

Final Step: Prep Pickled Strawberries

While that marinates, to a 12 oz mason jar, add:

  • 1/2 lb (8 oz) of firm, thoroughly cleaned strawberries with tops removed, cut in halves and quarters if large

  • 1 cup white balsamic or other mild vinegar like rice vinegar

  • 1 tsp sugar

  • 1/2 teaspoon kosher salt 

Let strawberries pickle for 15-30 mins and then strain from pickling liquid. Store strawberries in the fridge and use within 2-3 days to avoid mushiness. Pickling liquid can be stored separately in the fridge up to 7 days, and used as a salad dressing, or re-used to pickle more strawberries.  

Build Your Bowl
YOU DID IT! It’s time to build your delicious bowl!

Cut open a ripe avocado and, carefully, using a sharp knife, cut thin strips into the avocado horizontally, then vertically, leaving you with small squares to be spooned into your bowl.

First lay down a bed of lentils. Top with marinated tofu and a spoonful or two of the marinade. Add your avocado and finish with pickled strawberries and plenty of crispy quinoa. Add a drizzle of sriracha if desired & enjoy! 

*This recipe includes links to my Amazon store which earns commission that supports my recipe development. I only recommend products I truly love!

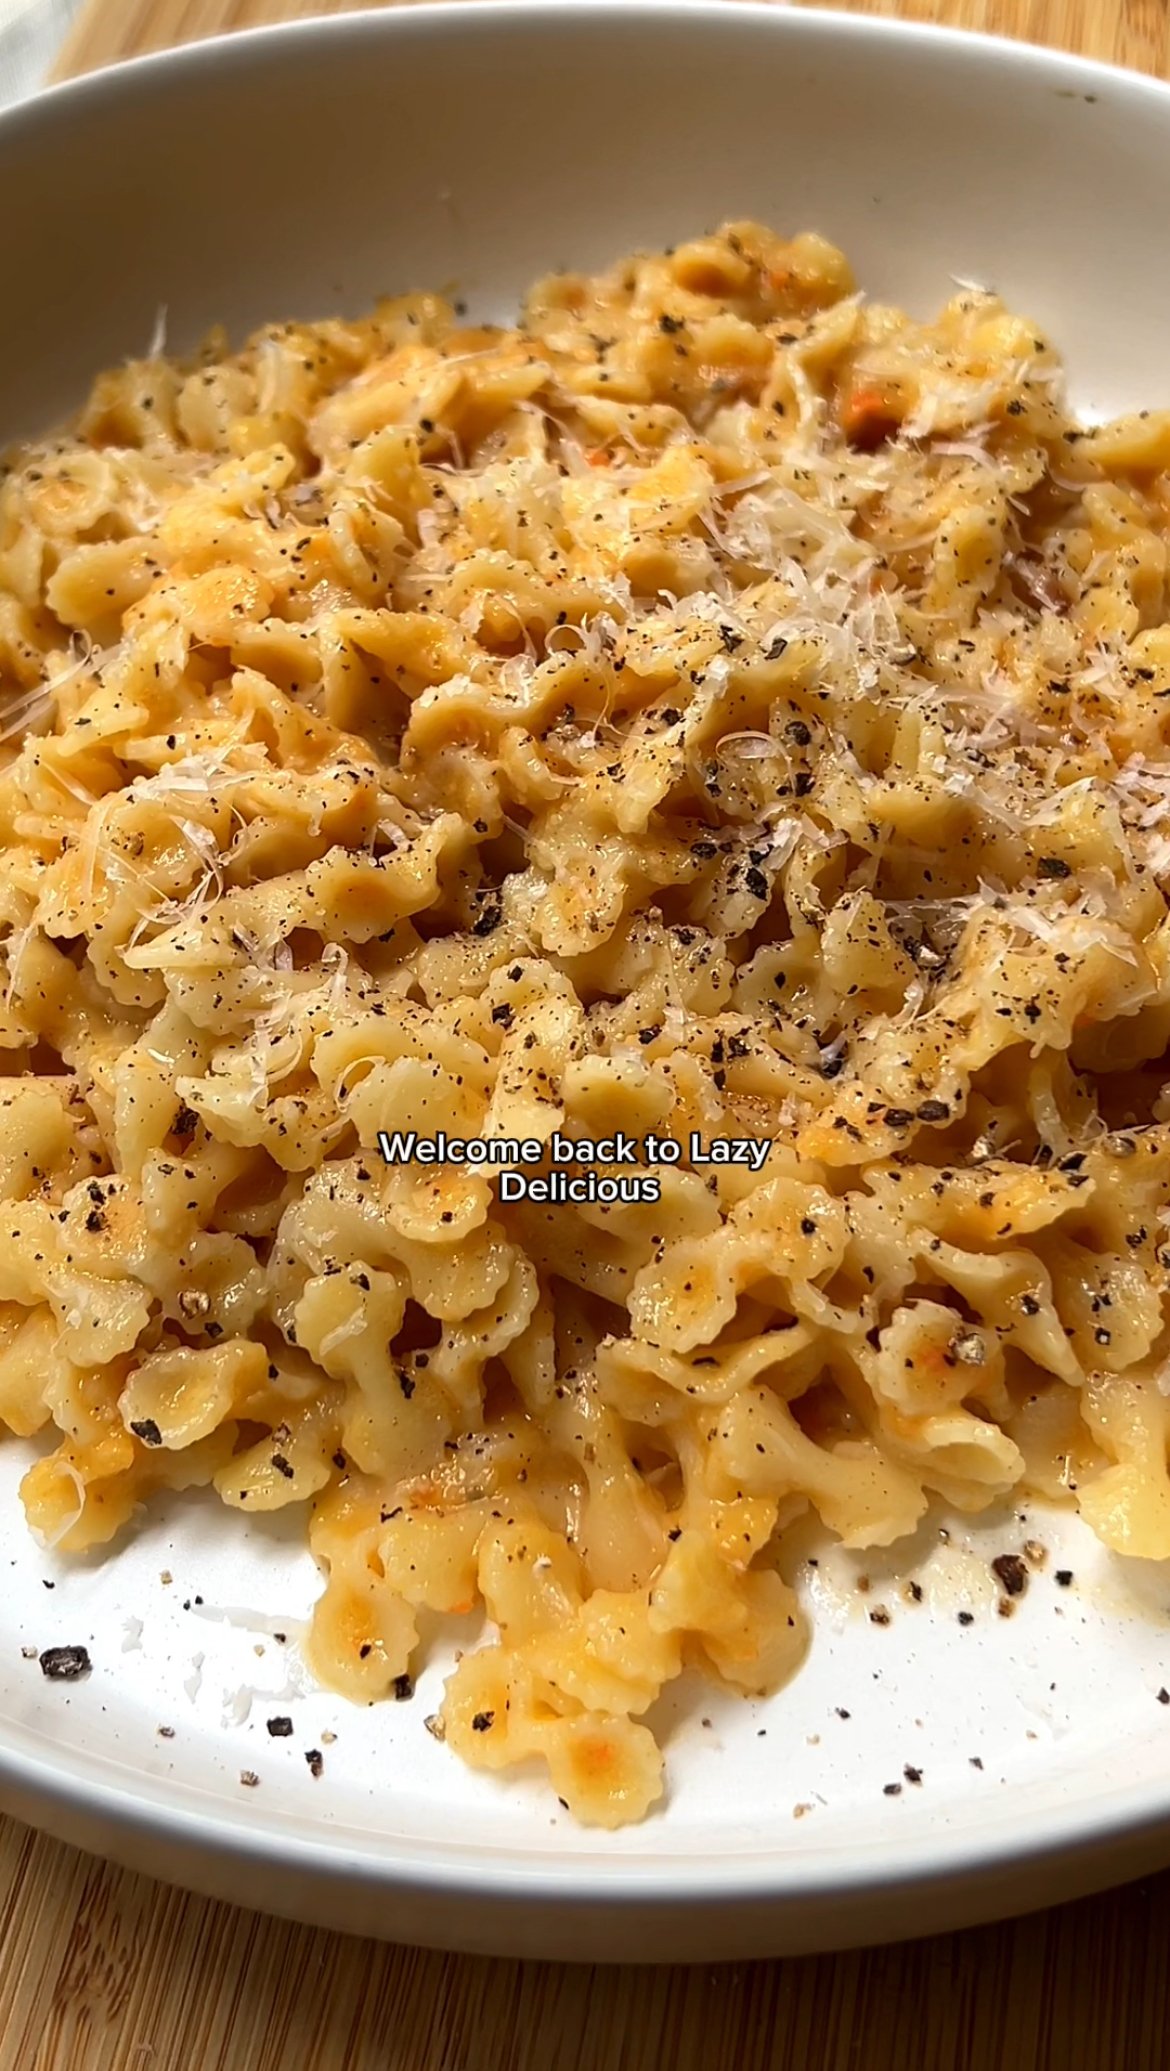
Farfalline in Carrot Miso Sauce

This 7-ingredient recipe (okay, 8!), is hygge for your tastebuds.

It's an umami, veg-packed farfelline that is like a cozy middle ground between soup and pasta. And it's a perfect opportunity to use up carrots that spent a few days too many in the bottom drawer. Trust me when I say, you need to make this.


Farfalline in Carrot Miso Sauce

Serves 2

  • 1 small bunch tri-color carrots, like Cal-Organic

  • 1/4 cup broth (veg, bone, chicken — any kind works), adding more as needed

  • 2 whole garlic cloves

  • 2 Tbsps Shiro Miso, or other miso paste

  • 1-2 Tbsps Butter or vegan alternative

  • Parmigiano-Reggiano or vegan alternative like nutritional yeast

  • 1 cup Farfelline

  • Freshly ground black pepper

  • Kosher salt, to taste

Preheat your oven to 400F and start a pot of water to boil for your pasta.

Rinse + peel your carrots and place on a baking sheet.

Then in the microwave, melt 1 Tbsp of butter or vegan alternative. To your warm butter, mix in 2 Tbsps of Shiro miso, or other miso paste.

Coat your carrots evenly all over with your butter and miso marinade, then top with 1-2 whole crushed garlic cloves. Roast carrots in the oven until carrots are tender all the way through, 10-20 minutes or more, depending on the thickness of your carrots.

Place roasted carrots and whole garlic in a blender or food processor along with 1/4 cup of broth and blend until smooth.

Salt your boiling pasta water, add farfalline and cook until al-dente, 5-6 minutes. In the meantime, add 2-3 spoonfuls of your starchy pasta water to the blended carrot sauce, along with 1/2 cup of loosely packed, freshly grated parmigiano-reggiano or vegan alternative, like nutritional yeast.

Blend to combine, taste and add salt, only if needed.

To your cooked, strained pasta, mix in another Tbsp of butter along with another 1/4-1/2 cup freshly grated parmigiano-reggiano (or vegan alt), lots of freshly ground black pepper and your carrot sauce.

Adjust the thickness of your sauce by adding more bone broth as needed. Finish with cheese and pep, and enjoy!

Cucumber & Fresh Herb Salad with Tamarind BBQ Chicken

My top tip for women trying to stay nourished? Bring meals together with sauce…

Specifically, high-quality, pre-made sauces. That’s why I am SO excited to be partnering with woman-founded Haven’s Kitchen as a brand ambassador. This means I get to bring you delicious 15, 20 and 30 minute meals using their line of inspired, easy-to-use sauces. These sauces are incredible meal starters and can be used for anything — from marinades to dressings, pasta sauces, dipping sauces & more.

This 30-minute salad is my personal new fav for summer weekday-eats. It’s satisfying, satiating and refreshing, using cool crunchy cucumber & tons of fresh herbs to bring the taste of summer to your plate in no time. Chicken thighs marinated in Haven’s Kitchen Tangy BBQ sauce are seared in a cast iron, turning into a caramelized sweet-and-savory masterpiece.
Click here and grab 10% off this sauce (and others) using code ‘thekitchenbymicole’ at checkout.*

*This is not a paid affiliate link but does help me continue to bring you trusted brands I love!


Cucumber & Fresh Herb Salad with Tamarind BBQ Chicken

SERVES 1-2

  • 1lb boneless, skinless chicken thighs

  • 2.5oz pouch Haven’s Kitchen Tangy BBQ Sauce (half the pouch)

  • ¼ - ½ cucumber, cut into rounds

  • ⅛ - ¼ red onion, cut into half rounds

  • ⅛ cup chopped fresh cilantro

  • ⅛ cup chopped fresh mint

  • ½ cup loosely packed arugula

  • Rice vinegar

  • Coarse kosher salt

  • Chili crisp or Mama Lam’s Malaysian Hot Sauce

  • Neutral oil

Marinate 1lb boneless skinless chicken thighs in about half pouch of Haven’s Kitchen Tangy BBQ sauce, or until all chicken is thoroughly coated. Let sit 30 minutes, or up to 1 hour in the fridge. Make sure to bring chicken back to room temperature before cooking.

Place 8-10 inch cast iron over medium high heat. Once the pan is warm, add 1-2 Tbsps of neutral oil, just enough so the bottom of the pan is coated.

When the oil is hot add chicken thighs to the pan, letting excess marinade drip off before adding. The chicken should sizzle when it hits the pan. If it doesn’t, remove and let the oil continue to heat. Cook 7-10 mins or until chicken has nice brown color on the first side, then flip.

While chicken is cooking, cut clean cucumber into thick rounds. Then by hand, break into smaller pieces.

Dice 1/8-1/4 of a red onion into thin half moons. First cut your onion in half from the root end through the bottom. Then cut both the top (root) and the bottom of the onion so it’s flat on both ends. Then holding your knife at a slight angle at first, work your way across the onion, cutting into thin half rounds.

Place cut onions in a bit of cold water to remove some of the sharpness.

When the chicken is browned, flip to the second side and continue cooking another 3-5 mins, or until 165F internal temperature is reached on a meat thermometer.

Build your salad: to a plate add arugula, cucumber and red onion. Sprinkle with a little coarse kosher salt and drizzle with rice vinegar. Gently toss and massage. On top place sliced, cooked chicken.

Sprinkle with chopped cilantro & chopped mint. Add a drizzle of Mama Lam’s Malaysian hot sauce or your favorite chili crisp. Toss and enjoy!

The Easiest Creamy Pinto Beans (Vegan)

Creamy, soft pinto beans are one of my favorite comfort foods…

This is how I make mine using nothing more than a can of beans and two cloves of garlic. They’re amazing on tacos, in my Shiitake Mushroom Burritos or just served as a side with some savory rice.


The Easiest Creamy Pinto Beans (Vegan)

  • 1 can Pinto Beans (I love Brad’s Organic beans)

  • 2 whole cloves fresh garlic, peeled and crushed 

  • 1 Tbsp extra virgin olive oil

  • Pinch kosher salt

To a pot add the entire can of pinto beans, unstrained. Add your 2 peeled & crushed garlic cloves, pinch of salt and extra virgin olive oil.

Bring to a boil. Then lower to a simmer and let cook until some of the excess liquid has cooked off, 15-20 minutes. Stir occasionally to make sure the beans are not burning on the bottom.

Once the liquid has reduced, remove the garlic cloves and use a large spoon or spatula to crush and break up the pinto beans. This helps them to get even more creamy. Continue to cook over a lower heat if you want them even thicker. When they are done cooking, add fresh cilantro and stir. Salt to taste, mix and enjoy!

Basmati Rice w. Dates, Cardamom & Clove

There are few things more comforting than a great bowl of rice.

This sweet, savory, fragrant basmati rice is no exception. Serve it as a side with just about anything from vegetables to proteins, or add chickpeas and make this the main event, finished with a drizzle of yogurt and Tamarind chutney.

AM2A0235.JPG

Basmati Rice with Dates, Cardamom and Clove

  • 1 cup basmati rice

  • 3-4 dates, pits removed and loosely chopped 

  • 11 whole cloves

  • 2 whole cardamom pods, crushed 

  • 1 Tbsp coconut oil 

In a pot add 1 Tbsp coconut oil, 2 lightly crushed cardamom pods, 11 whole cloves and 3-4 dates chopped into small pieces.

Cook together for a minute or two over medium heat, letting the spices get fragrant. Then add your rice to the pot and stir to combine. After a minute, add 1 3/4 cup water to the pot.

Bring to a boil. Once boiling, lower the heat, cover and simmer for 12-15 minutes, or until cooked (follow directions for the brand of rice you’ve chosen).

Once cooked, remove whole cloves and cardamom pods. Add a pinch of kosher salt, mix and enjoy.

Honey & Za'atar Smokey Roasted Pistachios

Addictive and very snack-able.

These pistachios have found themselves a consistent presence in my fridge. I reach for them as a solo snack, tossed into nearly every salad I make, on top of morning kefir bowls and also crowning a soon-to-arrive recipe for Rose Cardamom Pudding.

 
Micole Rondinone Honey & Za'atar Pistachios
 

Honey & Za'atar Smokey Roasted Pistachios

1 Serving 

  • 1 cup raw shelled pistachios

  • 1/4 tsp smoked paprika

  • 1/2 tsp za’atar

  • Kosher salt

  • Honey

  • OPTIONAL: zest of a clean lime

Preheat your oven to 300 F

Put some parchment down on a half sheet baking tray.

Add 1 cup of raw shelled (or unshelled) pistachios to the parchment. Drizzle with honey and then sprinkle with 1/4 tsp smoked paprika, 1/2 tsp za’atar and a good pinch of kosher salt.

Use a utensil to give the pistachios a mix before flattening them into a single layer.

Place in the oven for 15-20 minutes. They should be fragrant!

You can finish them with a bit of lime zest if you want! Serve immediately warm, or bring to room temperature before storing in the fridge up to 2 weeks.

Plant Based Roasted Sweet Potato Queso-Style Dip w. Caramelized Onions

Seriously, who doesn’t love a dip?!

I’m obsessed with female owned nut milk brand Three Trees. When I worked with them last year I fell in love with their incredible, creamy milks and instantly knew it would make the perfect base for a plant based dip. I’m also going to recommend some of my favorite tortilla chips from Xochitl for their ratio of thinness to dip-carrying-capacity.

Yes, this is a plant based “queso-style” dip and I put that in quotations in case you’re someone who does not believe in veganizing: I would hate for you to miss out on this dip for that reason. It’s just a great dip trying to be great! Made with simple plants and lots of flavor, we start by roasting the sweet potato and sautéing onions. This may seem like an extra step but don’t skip it, please. The name of the game to great food is LAYERING FLAVOR. When we roast and sauté our ingredients, we impart them with flavor before we’ve even blended and seasoned our dip. You can do this up to 2 days in advance, and then blend up later. Come over and make the recipe with me here!

 
AM2A7775.JPG
 

Plant Based Roasted Sweet Potato Queso-Style Dip with Caramelized Onions

Serves 6-8

  • 2 x medium sweet potatoes, 1 lb total

  • 1 medium yellow or Spanish onion

  • 1 Tbsp unsalted butter

  • 1 small white onion

  • 1/2 tsp cayennne powder

  • 1/2 tsp cumin powder

  • 1/2 tsp smoked paprika

  • 1/2 tsp chili powder

  • 2 cups Three Trees original almond milk

  • 2 Tbsp nutritional yeast

  • 4 Tbsps white wine or apple cider vinegar

  • 2 tsp chipotle Cholula, and more for serving

  • Fresh cilantro

  • 1 lime

  • Kosher salt

  • Coconut oil

  • Olive oil

  • OPTIONAL: 1.5 tsps corn starch for thickening

  • Xochitl Organic Blue Corn Tortilla Chips

Preheat oven to 380F degrees.

Peel and cut sweet potatoes into rounds. Add to a mixing bowl with 1.5 Tbsp coconut oil and a sprinkle of kosher salt. Toss to evenly coat.

Lay sweet potatoes on a baking sheet in a single layer and bake for 30 mins or until golden on both sides, flipping halfway through. When finished, cut rounds down loosely into quarters for easier blending.

In the meantime, let’s make caramelized onions: take your medium yellow or Spanish onion and remove the top and bottom root end so that it’s flat on both ends. Peel off outer skin. Cut onion in half, top to bottom, and then slice into thin, half moons. Add all the onions to a large pan with a splash of olive oil. Cook 15-20 mins over low heat, stirring frequently. If the pan gets dry, add a splash of water and mix. If the onions are cooking too fast and burning, turn the heat down.

When the onions are significantly cooked down, add 1 Tbsp butter to the pan and continue to cook over low heat until they are a deep golden color. Add a sprinkle of kosher salt. Remove from heat and set aside.

In a pot with a splash of olive oil, sauté 1  cup of loosely diced white onion. After a few minutes when the onion has started to soften, add a sprinkle of salt and 1/2 tsp cayenne, cumin powder, smoked paprika and chili powder. Mix and cook together another minute or so.

Then remove from the heat and add sweet potato pieces to the pot along with 2 cups Three Trees almond milk. Blend using a food processor, immersion or standard blender until smooth.

Taste and add a touch more salt if it needs. Also add 2 Tbsp nutritional yeast, 4 Tbsps white wine or apple cider vinegar and 2 tsp chipotle Cholula. Once all blended, place back in the pot and bring to a simmer, mixing frequently so you don’t burn the dip on the bottom of the pan. Once it’s bubbling, add a slurry to the pot to thicken - 1.5 tsps corn starch with 2 tsps water. The heat will activate the starch, thickening the dip, so continue to cook and mix for a minute or two after adding.

Remove from the heat and let cool a few minutes. Top with plenty of fresh cilantro, juice of half a lime, and all of the caramelized onions. You can even add another splash Cholula if you like. Live your best dip life!

A Fancy Roast Chicken

It felt like time to make roast chicken exciting again.

First, allow me to make the argument for a whole bird in case you’re still not convinced. Once seasoned, you put it in the oven and forget about it … for an entire hour and half. Talk about leisurely. Out of the oven comes multiple meals (and a veg, too, if you have the forethought), PLUS bones you can use for broth. It’s a no brainer. Raw chicken fears? I’ll address those below.

This recipe was born of one simple goal: roast chicken, deliciousness dialed way up. Start by building flavor from the inside out, stuffing your chicken with herbs, garlic and citrus. I added coriander seeds to the mix, which are tart and flowery, then coated the whole thing in a vibrant, savory spice blend of smoked paprika, kashmiri chili and garlic powder. Yeah, all you need to do when this chicken is ready is try not to drown an entire bowl of rice in the insanely delicious rendered juices.

 
Micole Rondinone Roast Chicken
 

A Fancy Roast Chicken

  • 4 lb whole Bell & Evans chicken

  • 1 whole lemon

  • 1 small head of garlic

  • 1 bay leaf

  • 1 tsp whole black peppercorns

  • 1 tsp whole coriander seeds

  • 1/2 tsp smoked paprika

  • 1 tsp garlic powder

  • 1 tsp kashmiri chili

  • Olive oil

  • OPTIONAL: sturdy root vegetable of choice, like potato, sweet potato, parsnip, carrots, etc

  • OPTIONAL: medium grain sushi rice for serving

Preheat your oven to 350F. Get out a cast iron large enough to accommodate the entire chicken (10-12 inches). You could also use a large dutch oven or baking dish with high sides. Before you intend to roast your chicken, take it out and let it start to come to room temperature.

Place the chicken in a large bowl so you easily avoid any fear of getting raw chicken on your surfaces. Take off the packaging and remove any giblets stored inside. Pat the chicken dry all over. Set aside.

Next, remove stickers from the lemon, rinse and cut in half across. Cut your head of garlic across to expose the cloves. In a small bowl, combine 1 bay leaf, 1 tsp whole black peppercorns and 1 tsp whole coriander seeds. Set aside.

In another small bowl, combine 4 Tbsps of olive oil with the remaining spices: 1/2 tsp smoked paprika, 1 tsp garlic powder and 1 tsp Kashmiri chili. Mix well.

If you plan to roast any root vegetables along with your chicken, clean and cut those now and place in the bottom of the cast iron or baking dish. Keep in mind that the veg will cook underneath the chicken for an hour and a half, so stick with bigger, thicker pieces that will do well with a long cook time (as opposed to small and thin).

Using one hand to hold your chicken, use the other to liberally salt both inside and out (yes, sprinkle salt along the inner cavity of the bird). Next stuff the bird with your 2 lemon halves, garlic halves, bayleaf, peppercorns and coriander seeds.

Once stuffed, place the bird into your cast iron or baking dish, on top of any veggies: using a silicone pastry brush, brush the entire chicken with the mixture of oil and spices. Do this here as opposed to in the bowl your chicken was in previously to allow excess oil and spices to just drip into the bottom of the pan and not go to waste.

Make sure to brush underneath any folds of fat near the front and back end of the bird, as well as underneath the wings, legs, etc. Once you’ve used up all of your spice mixture, place chicken right side up, tuck legs and wings close to the bird and stick in the oven for roughly 1.5 hours or until it reaches 165F internal temperature. I do not make chicken without my handy meat thermometer - you’ll never have to worry about either falling ill or overcooking chicken again. A perfectly timed chicken is insanely juicy.

When the chicken is done, let it rest before serving. I like to eat the thighs and drumsticks fresh from the oven, and found they were especially good over a bit of plump sushi rice with lots of the rendered juices drizzled over top. Throw the roasted veg on the plate and you’ve got a meal. Reserve the wings and breasts, and all the other bits you can pull off, which I like to use for a quick chicken salad. And don’t forget when you’re done with the chicken to place the whole carcass in an airtight bag and stick in the freezer. When you’ve made this twice, you’ll be all set for homemade broth.

Creamy Vegan Coconut Chickpea & Sweet Potato Curry

Silky, creamy, coconut -y, savory greatness.

The best meals tend to be the accidental ones: one night doing my usual pantry and fridge inventory, searching for dinner, I found some coconut milk, a can of chickpeas and some leftover roasted sweet potato. Could it be a curry? Why not. And 30 minutes later I had this luscious creamy meal.

 
Micole Rondinone Vegan Curry
 

Creamy Vegan Coconut Chickpea and Sweet Potato Curry

SERVES 1

For Sweet Potatoes

  • 1 Medium Sweet Potato, 8.5 oz

  • 1 Tbsp olive oil

  • 1/4 tsp ground allspice

  • 3/4 tsp kosher salt

  • Heaping 1/4 tsp smoked paprika

  • Heaping 1/4 tsp garlic powder

  • Freshly ground black pepper

For Curry

  • 1/8 small red onion, cut into thin rounds, 1.2oz

  • 1/4 tsp ground allspice, or whole - 5-6 berries 

  • 1/4 tsp ground turmeric

  • 1/2 tsp tandoori powder

  • 1/4 tsp vindaloo spice

  • 1/8 tsp smoked paprika

  • 1/2 tsp curry powder

  • 1/4 tsp cumin seeds

  • 1/2 tsp garlic powder

  • Kosher Salt

  • 3 Tbsps neutral oil

  • 1 Tbsp + 1 tsp tomato paste

  • 1 tsp finely minced fresh ginger 

  • 1/2 cup coconut cream (full fat)

  • 1 standard size can chickpeas, 15.5 oz

For Serving

  • 1/2 cup basmati or other rice (uncooked)

  • Fresh cilantro

  • Indian tamarind chutney (I like SWAD brand, also available for purchase in NYC HERE)

  • Your favorite Indian bread

First we will roast the sweet potatoes: preheat your oven to 400F. Scrub the sweet potato clean and cut into rounds, 1/4 in. thick, and then into quarters. In a bowl toss sweet potatoes with 1 Tbsp olive oil. To the bowl add your spices: 1/4 tsp ground allspice, 3/4 tsp salt, heaping 1/4 tsp both smoked paprika and garlic powder, and a few cranks of freshly ground black pepper.

On a baking sheet, drizzle a little olive oil and lay sweet potato quarters out in a single layer. Place in the oven for 12-15 mins until golden on the bottom side and then flip. Place back in the oven another 5-10 mins until crispy all over. When they are done, set aside. You can also make the sweet potato 2-3 days in advance and refrigerate.

While your sweet potatoes are baking, get your rice over the heat with a 1 Tbsp of coconut oil, if you have, or olive oil and a sprinkle of salt. When done cooking, cover until ready to serve.

You can also work on the curry: cut your red onion into rounds and then into quarter rounds, finely dicing a little and setting aside for garnish.

In a ramekin or small bowl, combine all of the spices for the curry: 1/4 tsp ground ground allspice (or 5-6 whole berries crushed), 1/4 tsp ground turmeric, 1/2 tsp tandoori powder, 1/4 tsp vindaloo spice, 1/8 tsp smoked paprika, 1/2 tsp curry powder, 1/4 tsp cumin seeds and 1/2 tsp garlic powder.

In a pot, heat neutral oil over medium heat. Add your ground spices and let them “bloom”, or cook, in the oil: doing this releases flavor compounds, and helps to distribute flavor evenly through the cooking process.

After a minute or two, when very fragrant, add onions to the pot, stir to coat and cook over a med low heat until onions are soft. Then add chickpeas and toss to coat evenly. Let them cook over med heat, about 5 mins. 

To the pot add 1 Tbsp and 1 tsp tomato paste, and 1 tsp finely minced ginger. Let cook a few minutes until the tomato paste is caramelized and brown in color.

Add 1/2 cup coconut cream and 1 tsp kosher salt. At the last moment, take your roasted sweet potato quarters and mix into the curry before removing from the heat to serve: having them maintain some of their crispiness adds a great textural difference. Mix and check seasoning, adding salt to taste.  

Serve over warm basmati rice. Finish with fresh cilantro and if you like, drizzle with this amazing tamarind chutney, which brings tartness and heat. Serve with Indian bread like naan.