Sweet & Tangy Marinated Tofu Bowl w. Pickled Strawberries

In my world, there is one rule for cooking: cook smarter not harder

so when you make this recipe, it’s basically like making lunch WHILE doing meal prep. Convenient, eh? (If you have low spoons, there are tweaks for you too!).

The reality is, so many people I talk to are simply sick of cooking, and it’s a daily chore they handle with varying levels of exasperation. Some are driven by the simple need to get fuel into their body, while others trudge through mealtime, bored & wishing they had more motivation, energy and creativity to cook tastier meals.

My cooking ethos is simple; making meals that pack restaurant quality flavor at home, should be easier. It should be more accessible. And it should be less exhausting. This recipe embodies those principles.

A combination of a few simple ingredients, given a tiny bit of extra TLC, can (and will) blow you away. And if I am ever going to present you with a recipe that involves many ingredients and numerous steps, I promise it’s because it’s going to pay off.

Making a large batch of each of this dishes numerous components means you’ll have delicious food to reach for all week long. From a crunchy quinoa topping you will want to put on everything, to tangy pickled strawberries that will blow your mind, to simple savory lentils that will help keep you fed. And when you sit down to enjoy how this orchestra of flavors and textures comes together in one bowl, you’re going to be SO glad you trusted me on this.


Sweet and Tangy Marinated Tofu Lentil Bowl with Pickled Strawberries

4-6 servings (store each component individually for ideal use throughout the week)

  • 1 cup lentils of choice, or 1 cup pre-cooked lentils

  • 1 cup rinsed quinoa, or 1 cup pre-cooked quinoa

  • 14 oz block of extra firm or firm tofu

  • 1/3 cup coconut aminos or tamari (soy sauce works too)

  • 1.5 Tbsp rice vinegar

  • 3/4 Tbsp honey, brown sugar or maple syrup

  • 1/2-1 medium garlic clove, finely grated

  • 1/4 - 1/2 teaspoon fresh ginger, finely grated

  • 1 tsp Mr. Bing sriracha, or to taste

  • 1/2 lb (8 oz) of firm, clean strawberries 

  • 1 cup white balsamic or other mild vinegar like rice vinegar

  • 1 tsp sugar

  • 1/2 teaspoon kosher salt

  • 1 small bunch scallions

  • 1 mild or hot red pepper, Thai chili 

  • 1 small ripe avocado 

  • Extra virgin oil

Prep Lentils

If not using pre-cooked lentils, which is a great time-saving hack, start by cooking 1 cup of lentils in a pot according to package directions. You can prepare more if you want an extra big batch for a large household or to freeze some.

Prep Quinoa

While lentils cook, prepare quinoa (again, if you have low spoons use a pre-cooked option). Cook at least 1 cup so you have leftovers. Once the quinoa is cooked, drizzle with olive oil.

Pre-heat an air fryer or your oven to 400F. Lay quinoa out in a single even layer (on air fryer insert/basket with a piece of parchment, or on a sheet pan) and toast for 15 minutes, stirring every 5 or so minutes, until crispy and dark golden brown. Toss with sea salt when hot and store in a Tupperware.

Prep Marinated Tofu

Drain liquid from tofu packaging & then to remove additional excess liquid, microwave tofu in a bowl for 2 minutes.

Pour out any released liquid, then press tofu under a heavy object between 2 sheets of paper towels another 15-30 minutes. Then cut tofu into small squares and in a bowl, marinate with below ingredients: 

  • 1/3 cup coconut aminos or tamari (soy sauce works too)

  • 1.5 Tbsp rice vinegar

  • 3/4 Tbsp honey, brown sugar or maple syrup

  • 1/2-1 medium garlic clove, finely grated

  • 1/4 - 1/2 teaspoon fresh ginger, finely grated

  • 1 tsp Mr. Bing Sriracha, or to taste

Marinate for at least 10-15 minutes. Then top with 1/2 cup scallions cut on the bias, and 1/4 cup red chili cut on the bias, adjusting the amount of chili for how hot your pepper is. Store in the fridge up to 5 days.

Final Step: Prep Pickled Strawberries

While that marinates, to a 12 oz mason jar, add:

  • 1/2 lb (8 oz) of firm, thoroughly cleaned strawberries with tops removed, cut in halves and quarters if large

  • 1 cup white balsamic or other mild vinegar like rice vinegar

  • 1 tsp sugar

  • 1/2 teaspoon kosher salt 

Let strawberries pickle for 15-30 mins and then strain from pickling liquid. Store strawberries in the fridge and use within 2-3 days to avoid mushiness. Pickling liquid can be stored separately in the fridge up to 7 days, and used as a salad dressing, or re-used to pickle more strawberries.  

Build Your Bowl
YOU DID IT! It’s time to build your delicious bowl!

Cut open a ripe avocado and, carefully, using a sharp knife, cut thin strips into the avocado horizontally, then vertically, leaving you with small squares to be spooned into your bowl.

First lay down a bed of lentils. Top with marinated tofu and a spoonful or two of the marinade. Add your avocado and finish with pickled strawberries and plenty of crispy quinoa. Add a drizzle of sriracha if desired & enjoy! 

*This recipe includes links to my Amazon store which earns commission that supports my recipe development. I only recommend products I truly love!

Cucumber & Fresh Herb Salad with Tamarind BBQ Chicken

My top tip for women trying to stay nourished? Bring meals together with sauce…

Specifically, high-quality, pre-made sauces. That’s why I am SO excited to be partnering with woman-founded Haven’s Kitchen as a brand ambassador. This means I get to bring you delicious 15, 20 and 30 minute meals using their line of inspired, easy-to-use sauces. These sauces are incredible meal starters and can be used for anything — from marinades to dressings, pasta sauces, dipping sauces & more.

This 30-minute salad is my personal new fav for summer weekday-eats. It’s satisfying, satiating and refreshing, using cool crunchy cucumber & tons of fresh herbs to bring the taste of summer to your plate in no time. Chicken thighs marinated in Haven’s Kitchen Tangy BBQ sauce are seared in a cast iron, turning into a caramelized sweet-and-savory masterpiece.
Click here and grab 10% off this sauce (and others) using code ‘thekitchenbymicole’ at checkout.*

*This is not a paid affiliate link but does help me continue to bring you trusted brands I love!


Cucumber & Fresh Herb Salad with Tamarind BBQ Chicken

SERVES 1-2

  • 1lb boneless, skinless chicken thighs

  • 2.5oz pouch Haven’s Kitchen Tangy BBQ Sauce (half the pouch)

  • ¼ - ½ cucumber, cut into rounds

  • ⅛ - ¼ red onion, cut into half rounds

  • ⅛ cup chopped fresh cilantro

  • ⅛ cup chopped fresh mint

  • ½ cup loosely packed arugula

  • Rice vinegar

  • Coarse kosher salt

  • Chili crisp or Mama Lam’s Malaysian Hot Sauce

  • Neutral oil

Marinate 1lb boneless skinless chicken thighs in about half pouch of Haven’s Kitchen Tangy BBQ sauce, or until all chicken is thoroughly coated. Let sit 30 minutes, or up to 1 hour in the fridge. Make sure to bring chicken back to room temperature before cooking.

Place 8-10 inch cast iron over medium high heat. Once the pan is warm, add 1-2 Tbsps of neutral oil, just enough so the bottom of the pan is coated.

When the oil is hot add chicken thighs to the pan, letting excess marinade drip off before adding. The chicken should sizzle when it hits the pan. If it doesn’t, remove and let the oil continue to heat. Cook 7-10 mins or until chicken has nice brown color on the first side, then flip.

While chicken is cooking, cut clean cucumber into thick rounds. Then by hand, break into smaller pieces.

Dice 1/8-1/4 of a red onion into thin half moons. First cut your onion in half from the root end through the bottom. Then cut both the top (root) and the bottom of the onion so it’s flat on both ends. Then holding your knife at a slight angle at first, work your way across the onion, cutting into thin half rounds.

Place cut onions in a bit of cold water to remove some of the sharpness.

When the chicken is browned, flip to the second side and continue cooking another 3-5 mins, or until 165F internal temperature is reached on a meat thermometer.

Build your salad: to a plate add arugula, cucumber and red onion. Sprinkle with a little coarse kosher salt and drizzle with rice vinegar. Gently toss and massage. On top place sliced, cooked chicken.

Sprinkle with chopped cilantro & chopped mint. Add a drizzle of Mama Lam’s Malaysian hot sauce or your favorite chili crisp. Toss and enjoy!

Chili & Cilantro Fairytale Eggplant w. Labneh

Fairy Tale eggplant are a summer delight.

If you love eggplant but avoid large, globe eggplant, which can be bitter and require time & love to bring out their tender side, then this tiny eggplant cousin is for you.

Tender and easy to cook with a deliciously mild flavor, these eggplant have been coming home with me week after week from the farmer’s market. All they need is a little oil and 3-5 minutes cut side down in a hot cast iron. Slightly larger ones may need another few minutes on the other side, and then they’re ready to be served any way you like. This dish is definitely one where you can flex your creativity and choose your own adventure: I like mine served warm over labneh, with a drizzle of chili oil, one final dash of salt and fresh cilantro.


Chili & Cilantro Fairytale Eggplant with Labneh

Serves 2

  • 10-12 Fairy Tale Eggplant

  • Neutral oil, like Avocado, Safflower or Sunflower

  • Kosher salt

  • Freshly ground black pepper

  • 2-3 heaping spoonfuls labneh

  • Chili oil, like Fly by Jing or Chili Onion Crunch from Trader Joe’s

  • Fresh cilantro or other fresh herb

Heat a well seasoned cast iron over med-high heat.

In the meantime, wash and cut Fairy Tale eggplant in half lengthwise. Drizzle the cut side with neutral oil, sprinkle with salt and freshly ground black pepper.

When the cast iron is hot, place the eggplant cut side down until they’re golden and seared, 3-5 minutes. Larger eggplant may need another few minutes on the other side to become tender throughout. Remove eggplant from the cast iron and let cool a few minutes.

Plate over a few heaping spoonfuls of labneh. Drizzle with your favorite condiment like chili oil or zhug. Finish with fresh cilantro and/or other fresh herbs. Enjoy!

Date Roasted Carrot Salad w. Burrata, Mint & Chili

I love the transformation of humble ingredients.

Carrots are so simple and a thought I had recently was that I don’t make them enough. Though I occasionally think of baby carrots as a counterpart for hummus, for the most part, right size, whole carrots fall out of my consciousness when it comes time to grocery shopping. I find that, like eggplant or other certain vegetables, the deliciousness of a carrot is all about knowing how to treat it: not well seasoned or well cooked, a carrot would gladly be easily forgotten. So, yes, you are going to be sure to bathe these in a mixture of butter and sweet date (or fig) jam and cook until caramelized and completely melt in your mouth tender. To go the no-food-waste mile, be sure to use some of the carrot stem as a garnish.

 
AM2A8821.jpg
 

Date Roasted Carrot Salad with Burrata, Mint & Chili

Serves 2

  • 7 thin carrots, or cut in half if they are wide, total 8 oz

  • 1.5 Tbsps unsalted butter 

  • 1 Tbsp date jam (or use fig jam)

  • Small bunch of fresh thyme

  • Toasted sunflower seeds

  • 1 ball of burrata 

  • 1/2 small hot red chili, finely sliced

  • Fig balsamic

  • Fresh mint for garnish

  • OPTIONAL; carrot stems very finely minced

  • Kosher salt

  • Freshly ground black pepper

  • Neutral oil

Preheat your oven to 400F. First rinse & scrub your carrots. Trim the carrot stems down so that just a short stem remain. Keep a few of the stems without any of the leaves.

Dry your clean carrots and in a high-heat, oven safe pan (like stainless steel or cast iron), heat a little neutral oil over high heat until hot and just barely smoking. Add the carrots, making sure they can sit in a single layer. You’ll probably need a 8-10 inch pan. Add two pinches of kosher salt and a few cranks of freshly ground black pepper and toss the carrots a bit in the pan. Sear, turning occasionally, 5-7 minutes, until golden brown on all sides.

In the meantime, mix 1.5 Tbsps of melted unsalted butter with 1 Tbsp of date (or fig) jam. Add a pinch of kosher salt and stir well.

When the carrots have a slightly golden hue all over, remove the whole pan from the heat. Set on a cool burner and wait a few minutes to allow the pan to cool slightly.

Using tongs, lift carrots and place your bunch of thyme down in the pan. Place carrots back on top of the thyme, brush evenly with the butter and date (or fig) glaze and then put the pan in the oven 12-15 minutes or until carrots are fork tender all the way through.

While the carrots are in the oven, very, very finely chop a bit of thin, clean carrot stems.

Slice a hot red chili into very thin rounds. When the carrots are ready, carefully remove the pan from the oven. Pull off the bundle of thyme and move carrots to a cutting board.

Cut them on the bias into smaller segments and place into 2 bowls, layering the carrot. Cut burrata open and place a half of burrata in each bowl next to the carrots.

Top with rounds of hot chili, a few small leaves of fresh mint, toasted sunflower seeds a sprinkle of the very finely cut carrot stem.

Cut burrata open, and drizzle with fig balsamic.

Kale Brussels Sprout Salad w. Pecorino & Toasted Nuts

Kale ain’t boring when you coat it with homemade lemon oil and pecorino cheese.

Don’t forget a sprinkling of warm, crunchy toasted pistachios and walnuts. I’ve never written a “Copycat” recipe before, but this salad stuck with me long after I ate it in the backyard of Aurora Bk, paired with a beautiful glass of Italian red wine and surrounded by twinkling lights. We tend to think of salad as a meal suited for summer, but this combination is so comforting and perfectly suited for when you need a dose of greens during chilly winter months.

 
Micole Rondinone Kale Salad
 

Kale Brussels Sprout Salad with Pecorino and Toasted Nuts

Serves 2

Lemon oil 

  • ½ cup extra virgin olive oil

  • ½ large lemon, scrubbed clean and peel removed in strips without any bitter white pith

Salad

  • 5 med Lacinato or Tuscan kale leaves, cleaned and cut into fine strips

  • 5 med Brussels sprouts, rinsed and shaved on a mandolin or finely cut using a sharp knife

  • ¾ cup mix of roasted salted pistachios and raw walnuts

  • ⅔ cup finely grated Pecorino

Dressing

  • 2.5 Tbsps lemon oil

  • 1 tsp fresh squeezed lemon juice

  • Pinch salt

To make your lemon oil, add olive oil and lemon peel to a small saucepan (make sure the lemon peel has no bitter white pith on it as it can make the oil taste bitter as well). Warm over a low-medium heat for about 20 minutes, watching and turning the heat down if necessary to avoid any bubbles from forming in the oil. Then remove from the heat and let steep 10 minutes, or until oil has reached room temperature. Strain through a fine mesh strainer and discard lemon peel. If you make extra oil than you need, store in a dark jar in a cool place.

Next, clean and finely cut your kale, removing the thick middle stem. Roll the leaves together and chiffonade, or cut into fine strips. Similarly, rinse your brussel sprouts and using a mandolin, shave into thin strips or cut using a sharp knife. Add to a bowl and toss with lemon oil, lemon juice and a pinch of salt. Massage the greens and then place in the refrigerator for up to 30 minutes.

Over a medium heat, toast pistachios and walnuts in a dry pan, making sure not to burn, just 3 to 5 minutes, until fragrant. In the meantime, finely grate ⅔ cup pecorino cheese.

Remove greens from the fridge and add toasted nuts and most of the grated cheese. Toss gently with your fingers to mix, and serve with a little extra cheese on top. Serve immediately.

Grounding Lentil and Grain Salad

Is it a salad? A grain bowl? A soup?

It’s all three. Before I make a big batch of something, I try to ask myself: am I going to still want to eat this tomorrow, and the day after, and then maybe even the day after that? I find the best way to confront that is to start with a base that can be made into multiple unique dishes. Have this the first day as a warm grain bowl, all on it’s own. The next day, make it into a lunch bowl, topped with roasted chicken and/or tons of roasted vegetables, drizzled with your favorite dressing or a nice scoop of Creamy Roasted Red Pepper Sauce. Then, just when you’re getting sick of it, submerge in a bowl of warm hearty broth with a tick of fresh squeezed lemon, turmeric and extra black pepper.

 
Micole Rondinone Grain Bowl
 

Grounding Lentil and Grain Salad

  • 1 cup Israeli cous cous, cooked in 1 ½ cups water - or grain of your choice

  • 1 cup red lentils, cooked in 3 cups water - or lentils of your choice

  • 7-8 mushrooms (use any variety from white to bella to shiitake)

  • Finely chopped parsley

  • 2 garlic cloves

  • Sea salt

  • Freshly ground black pepper

  • Turmeric

  • Garlic powder

  • Extra virgin olive oil

  • OPTIONAL: fresh rosemary, labne or plain thick yogurt, lemon juice

For this recipe, you can make do with whatever kinds of lentil and grains that you prefer, or have on hand in your pantry.  The key is flexibility. If that’s the case, start by cooking whichever of the two that takes longer to cook, and cook according to package directions.

If you’re using red lentils and Israeli cous cous, start with the red lentils:

Rinse in a fine mesh strainer and then put in a pot with the water, a sprinkle of sea salt, 2 whole peeled garlic cloves and roughly ½ teaspoon turmeric.  Bring to a boil, then reduce to a simmer, cover and cook until tender and liquid is cooked off, 15-20 minutes.  Red lentils can get mushy, so make sure to monitor them and when they are tender, take off the heat. If your lentils are finished and there is still excess water in the pot, strain.  Make sure to remove whole garlic cloves.

In the meantime, cook your cous cous.  Bring water to a boil. Then add couscous and a pinch of salt.  When the water starts boiling again, reduce heat to a simmer, cover and cook until tender, about 10-15 minutes. Strain out any remaining liquid.

While your lentils and grains cook, cut mushrooms into thin slices.  Heat cooking fat in a small pan. Add mushrooms and season to taste with salt, black pepper, a little garlic powder, and a sprig of fresh rosemary if you have on hand.  Cook over medium heat until mushrooms are soft and flavorful. Remove the whole rosemary.

When your lentils and grains are finished, turn heat off and combine in one pan.  Gently fold in the mushrooms and adjust seasoning to taste. You can also opt to keep all of your ingredients separate - lentils, grains and mushrooms, and combine when serving to the ratio you prefer.

Serve warm and top with fresh parsley, a squeeze of lemon and plain yogurt.  After a few days, you can submerge all ingredients in broth for a fantastic soup.

Gochujang Caesar Salad

This twist on a classic is bright and unique…

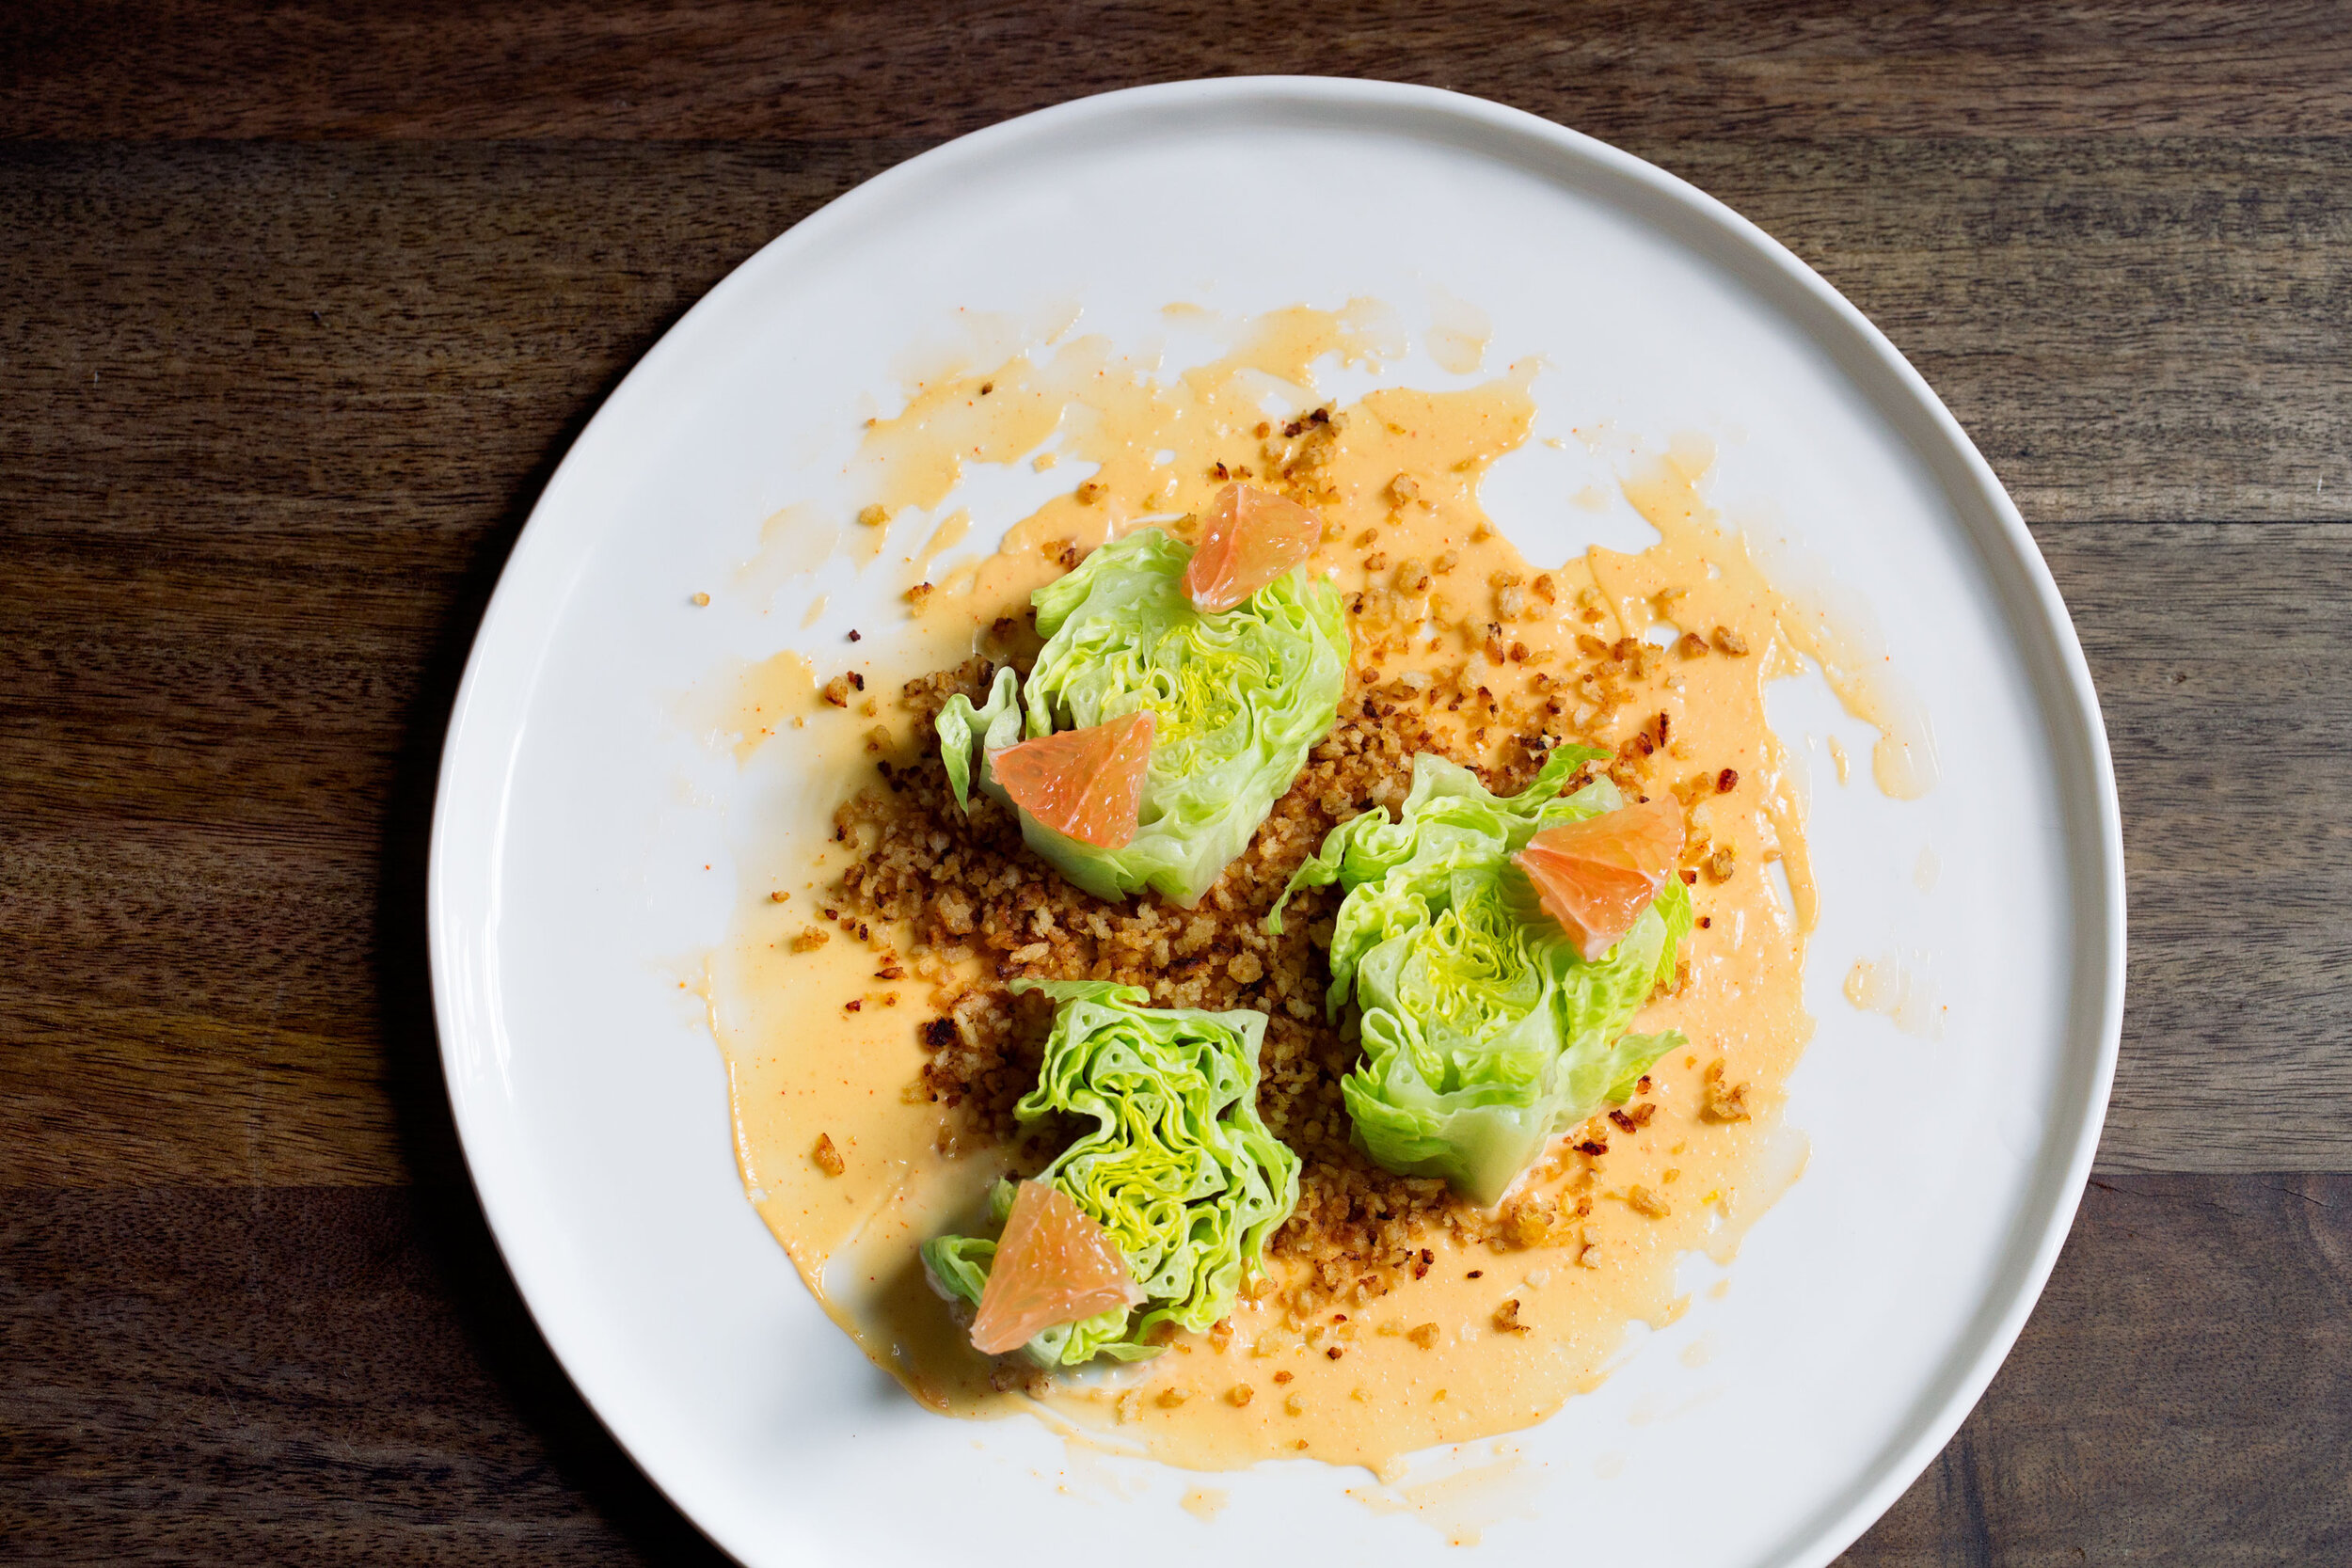
Don’t let the word “salad” or the sight of something green scare you away. Although quarantine has defined 2020 as the year of the carb (#Sourdough), in 2020 we also refuse to eat boring salads. In this riff on a Caesar, petals of crunchy romaine heart are the perfect vehicle for a rich dressing flecked with heat from the addition of Korean Gochujang paste. In place of parmesan and croutons, there is a warm, umami breadcrumb that comes to life with layers of flavor: rich miso, ginger, tamari, floral grapefruit zest and yes - butter. Let’s just say this is Caesar salad with a major glow up. If you’re feeling up for it, go for the full plating — it will feel like you’re taking yourself (and whoever is stuck at home with you!) out to a fancy dinner.

 
AM2A6233.jpg

Gochujang Caesar Salad

Serves 4

  • 2 romaine hearts

  • 1 whole very ripe grapefruit

GOCHUJANG CAESAR DRESSING:

  • 2 room temperature egg yolks

  • 2 tsps lemon juice

  • ¾ cup of neutral oil, or until mayonnaise is semi-stuff

  • Kosher salt

  • 1 clove garlic, smashed with the flat side of a knife

  • 1 anchovy fillet, cut in half (2 if you like)

  • ½ tsp fresh squeezed grapefruit juice

  • Juice of ½ lemon

  • 1 ½ tsp gochujang (korean chili paste)

  • ¾ tsp rice vinegar

BREADCRUMBS:

  • 1 Tbsp of unsalted butter, softened at room temperature or melted slightly in a microwave

  • 1 tsp grated ginger

  • 1 medium clove garlic, finely minced

  • 2 Tbsp white miso

  • ¼ teaspoon hot sesame oil

  • ¼ teaspoon Tamari

  • ½ cup of panko bread crumbs

  • Grapefruit zest. added at the end, while warm

First, take your whole grapefruit and rinse it, since we will use some of the outside for zest. The more ripe the grapefruit, the better as it will lend a sweeter flavor. Cut the grapefruit in half, across instead of top to bottom. Juice one half into a bowl and strain to remove seeds and solids.

Set the other half aside, as you may want to use some for plating.

Start by making a stiff unsalted mayonnaise. For such a small amount, the best way to do this is in a medium mixing bowl with a large, balloon whisk. Prepare for a very gratifying arm workout! (If you have a hand mixer, you can use that instead!)

If you are making your mayo by hand, stabilize your bowl by laying down a slightly damp kitchen towel on your counter. Place an empty pot on top, with a second damp kitchen towel draped over it. Secure the bowl inside the pot. Now it will not move while you whisk like a maniac!

To the bowl, add two room temperature egg yolks and 2 tsps of lemon juice. You can always bring egg yolks to room temperature by placing whole eggs right out of the fridge in hot water for a minute or two. One drop at a time, start to whisk in your neutral oil with the egg yolks and lemon juice. You really have to do this one drop at a time initially, or the oil will separate instead of emulsify. Once about half of your oil is added and emulsified, you can start to add the oil a little more quickly. When you’ve incorporated all of your oil, or your mayonnaise has reached a fairly stiff texture, it’s ready. (Did your emulsification break? No stress! Here’s a great video for fixing it.)

Once your mayonnaise is made, mix in your seasoning elements:

In a mortar and pestle, or on a cutting board, make a paste of 1 garlic clove, 1-2 anchovy fillets and a heaping ¼ tsp of salt. It may take a minute or two to get a paste. Whisk into mayonnaise. Then add juice of ½ lemon, ½ tsp of grapefruit juice (making sure neither have seeds or solids), and ¾ tsp rice vinegar. Mix well.

Next, add 1 ½  tsp of gochujang, making sure to incorporate it in evenly. Taste for salt and heat -- add a little more gochujang if you like. Once finished, cover and set aside. You can also make this dressing in advance, and keep refrigerated up to 5 days.

Gently rinse your romaine hearts, being careful to maintain the layers, and set aside on top of a kitchen towel or paper towel to dry.

AM2A6105.jpg

In the meantime, in a small bowl, mix together 1 tablespoon of softened unsalted butter, 1 teaspoon peeled, finely grated ginger, finely minced garlic clove, 2 tablespoons of white miso, ¼ teaspoon of both tamari and hot sesame oil. Mix well and then gently fold in ½ cup of panko bread crumbs. 

In a small, nonstick pan, brown bread crumbs over medium low heat, agitating constantly making sure not to burn them. If you have only a stainless pan, add canola oil to the pan before cooking and scrape bottom of the pan often. When a majority of the bread crumbs have turned a darker shade of brown, take off the heat and move to a small bowl to cool.

To serve, gently toss romaine with dressing, top with warm breadcrumbs and finish with grapefruit zest.

Or, if you’re feeling fancy, plate it up properly: using a large, preferably flat dinner plate, add 2 Tbsps of dressing to the middle of the plate. Using the back of a spoon or an offset spatula, spread the dressing into a thin, even layer.

Add grapefruit zest to warm bread crumbs. Mix and then add some to the plate.

Cut your romaine hearts across into 1 inch rounds, holding all the layers together with your fingers. Carefully place 2-3 around the plate, lightly pressing them down into the layer of dressing and breadcrumbs on the plate to secure them.

Finish with very thinly cut pieces of ripe grapefruit.

AM2A6149.jpg

Crunchy Radish Salad w. Yogurt & Toasted Coconut

I’d be lying if I said I didn’t have a complicated relationship with radishes.

Superficially, I’ve always been drawn to them for their gorgeous color, and in practice, because of their peppery potential. Yet, something always happens once they land in my fridge: they go soft in the bottom drawer. Anyone else? So I decided 2020 would be the year to shift my relationship with radishes once and for all.

The first step is knowing how to store them in case you don’t use them right away. The second is, obviously, knowing what to do with them, and this dish, for me, is a simple solution. Sour lemon and tangy plain yogurt cut the heat of the raw radish, while sesame seeds and hot sesame oil add a little earthiness and heat. Finish with toasted coconut for a hint of sweetness, and you’ve got layers of crunchy, creamy goodness.

Micole Rondinone Crunchy Radish Salad

Crunchy Radish Salad with Yogurt & Toasted Coconut

Serves 1

  • 2 oz thinly sliced radish rounds

  • ¾ tsp freshly squeezed lemon juice

  • ¼ tsp sesame seeds

  • ¼ tsp cilantro stems, finely cut

  • 1 ½ tsp diced scallion, green top

  • ⅛ tsp urfa biber

  • 1-1½ Tbsp plain yogurt

  • ½ Tbsp toasted coconut flakes

  • Pinch of coarse sea salt

  • Hot or plain sesame oil

First, thinly slice your radishes into rounds. You can store them this way, submerged in cold water in your fridge to use for this or other dishes throughout the week. If you have a mandoline, this is my favorite way to cut lots of radishes thinly and quickly.

In a mixing bowl, combine cut radishes with sesame seeds, cilantro stem, scallions, urfa biber and sea salt. Toss to combine. In a serving bowl, add your layer of plain yogurt. Add lemon juice to your radishes and toss again. Add to your bowl on top of yogurt. Drizzle with a little hot or plain sesame oil. Finish with toasted coconut flakes and serve immediately.